Wednesday, May 18, 2011

Spinach and Shrimp Quesadillas

This was super easy. 


Ingredients:

Frozen shrimp
1 package of frozen spinach
Cheese of your choice (I used mozzarella)
Any seasonings you would like to add (I used Parmesan cheese, salt, pepper)


Thaw the shrimp and the spinach according to the package directions.  Heat the shrimp and the spinach together in a skillet and season as desired.  Layer shrimp mixture and cheese on a tortilla and heat in a quesadilla maker or on a frying pan on medium heat until cheese is melted.

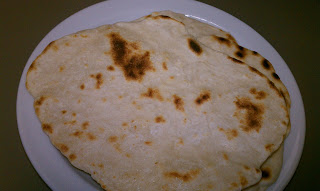
Texas Flour Tortillas

I have no clue how I found the blog called The Homesick Texan...I think it was when I was looking up recipes for Hello Dolly bars. Anyway, I browsed her recipes and saw she had some for corn an flour tortillas so I kept that mental note (which now I could just pin on Pinterest!). Tonight I wanted to make spinach and shrimp quesadillas (which I did and will post the recipe for that too) but we were out of tortillas (I bought 20 a week ago. We have a problem.) So I looked up the recipe and got to work. 


Texas Flour Tortillas (adapted from The Border Cookbook by Cheryl Alters Jamison and Bill Jamison)

Ingredients:

Two cups of all-purpose flour (can make them whole wheat by substituting one cup of whole-wheat flour for white flour)
1 1/2 teaspoons of baking powder
1 teaspoon of salt
2 teaspoons of vegetable oil
3/4 cups of warm milk

Method:

Mix together the flour, baking powder, salt and oil.
Slowly add the warm milk.
Stir until a loose, sticky ball is formed.

Knead for two minutes on a floured surface. Dough should be firm and soft.
Place dough in a bowl and cover with a damp cloth or plastic wrap for 20 minutes.
After the dough has rested, break off eight sections, roll them into balls in your hands, place on a plate and then cover balls with damp cloth or plastic wrap for 10 minutes.


After dough has rested, one at a time place a dough ball on a floured surface, pat it out into a four-inch circle, and then roll with a rolling pin from the center until it’s thin and about eight inches in diameter.  Keep rolled-out tortillas covered until ready to cook.

In a dry iron skillet heated on high, cook the tortilla about thirty seconds on each side. It should start to puff a bit when it’s done.

Keep cooked tortillas covered wrapped in a napkin until ready to eat.
Can be reheated in a dry iron skillet, over your gas-burner flame or in the oven wrapped in foil.
While you probably won’t have any leftovers, you can store in the fridge tightly wrapped in foil or plastic for a day or so.
Makes eight tortillas.


Go here to check out the Homesick Texan blog!

Dress Re-Purpose

Do you ever look at something you purchased in the past and think "What was I thinking?" This happens to me every now and then but since I have started blog stalking I have kept some of these items in hopes that I will find another use for them.  In my Pinterest obsession I have seen several tutorials for skirts like this or this. Then I remembered that while I was cleaning out my closet before we moved to Texas I set aside a purple jersey dress that I purchased several years ago.  I thought to myself "Why have a kept this?" and then remembered that I met my husband wearing the dress so I wasn't ready to get rid of it.  Anyway, this dress was perfect for a re purpose!


So let's not judge here...I like the color and it was super comfy. The neckline was cute and it tied in the back. But what in the world is going on with the gems in the middle?  So here is what I did. I cut off the top and cut off the gems.

Then I decided to cut off the layer of fabric that the gems were attached to because it was the texture of  a ribbon..  I turned the band that was left into the skirt and then I sewed it down. Now since I have never sewn jersey material before and I was having to turn the skirt the finished band is a bit ruched by accident.  However, once you have on a shirt with the skirt you really can't tell.


So here is my final skirt and my toes. I swore they were not in the picture when I took it.  The skirt goes to my knees and that is perfect for me because this is a lounging skirt so longer is good for couch sitting.  I am wearing it down with a white tank top.

I kept the ties from the back of the dress, the sleeves and yes even those gems. I will find something to do with them!

Menu Board

I have a new obsession...it is called Pinterest and it is addicting.  You sign up for the website and you can tag anything online onto your Pinterest page.  They categorize your pins so you can have fashion pins, DIY pins, quilt pins etc. I like it to catalogue crafts I want to do or clothes I want.  In my pinning I came across a menu planner that Emily pinned.  I have a ton of extra picture frames sitting around so I went to the office, got a piece of scrapbook paper and cut it to the frame size.  I made days of the week labels in word and printed them along with the word MENU. I cut it all out and pasted it on the scrapbook paper.  Then I connected an overhead marker from my teaching supply box with some ribbon and hung the menu board in my kitchen. Eventually I want to hot glue magnets on the menu board and put it on the fridge.  Sorry for the poor quality picture but my phone camera flash was reflecting off of the glass.  PS if you have a circut or silhouette this would come out much nicer I am sure.


Feta Stuffed Chicken

I got this recipe in an email from Better Homes and Gardens. It came from Diabetic Living Online. It was really good. I did not have tomato basil feta so I added basil and some tomato paste to the cheese mixture.  I just used frozen spinach and I made garlic mashed potatoes to go with it.  Fly Boy ate 4 of the 6 chicken breasts that I made.


<><><> <><><>
    2 tablespoons fat-free cream cheese (1 ounce)
1/4  cup crumbled basil-and-tomato feta cheese (1 ounce)*
                  4  skinless, boneless chicken breast halves (about 1-1/4 pounds total)
                1/4 teaspoon black pepper
                             Dash salt
               1 teaspoon olive oil or cooking oil
                1/4 cup chicken broth
                10-ounce package prewashed fresh spinach, trimmed (8 cups)
                2 tablespoons walnut or pecan pieces, toasted
                tablespoon lemon juice
Lemon slices, halved (optional)

1. In a small bowl combine feta cheese and cream cheese; set aside. Using a sharp knife, cut a horizontal slit through the thickest portion of each chicken breast half to form a pocket. Stuff pockets with the cheese mixture. If necessary, secure openings with wooden toothpicks. Sprinkle chicken with pepper and salt.
2. In a large nonstick skillet cook chicken in hot oil over medium-high heat about 12 minutes or until tender and no longer pink, turning once (reduce heat to medium if chicken browns too quickly). Remove chicken from skillet. Cover and keep warm.
3. Carefully add chicken broth to skillet. Bring to boiling; add half of the spinach. Cover and cook about 3 minutes or just until spinach is wilted. Remove spinach from skillet, reserving liquid in pan. Repeat with remaining spinach. Return all spinach to skillet. Stir in the nuts and lemon juice.
4. To serve, divide spinach mixture among 4 dinner plates. Top with chicken breasts. If desired, garnish with lemon slices. Makes 4 servings.

NOTE: I did not have tomato basil feta so I added a pinch or two of dried basil and a tbsp of tomato paste to the feta/cream cheese mixture.  Also I baked my chicken instead of pan frying at 350 degrees for about 25 minutes.

Peanut Butter Chocolate Chip Blondies

Another food blog I like to check out is Kaitlin In The Kitchen. She always has really good recipes on her blog.  I had a major sweet tooth the other day and decided to make these blondies/brownies.  I don't have a picture because Fly Boy ate the entire pan in one day!

Ingredients:
1 1/3 Cups Packed Brown Sugar
1/4 Cup Butter or Margarine, melted
1/2 Cup Peanut Butter
1 Teaspoon Vanilla Extract
3 Eggs
1 1/2 Cups All-Purpose Flour
3/4 Teaspoon Baking Powder
1/4 Teaspoon Baking Soda
1/2 Teaspoon Salt
1 Cup Semi-Sweet Chocolate Chips

Directions:
In large bowl, beat brown sugar, butter or margarine, peanut butter, vanilla, and eggs until well blended. Stir in flour, baking powder, baking soda, and salt; mix well. Spread batter into a greased pan and bake in a pre-heated 350 degree oven for 25 to 30 minutes or until golden brown and toothpick inserted in middle comes out clean.

Wednesday, May 4, 2011

Who Knew I Could Kind of Paint?

A few weeks ago, shortly after moving to South Texas, my neighbor and I were talking about things to do in the area and she mentioned there was a painting studio that you can go to where they teach you how to paint a picture step by step.  You also get to drink while you do this! We decided to sign up for one of the classes. In the class we learned how to paint a fancy cross.  I, of course, had to paint mine just like the example because thinking of out the box when it comes to painting just isn't my thing.  Considering I have zero painting talent I was fairly happy with how my picture turned out. 


The reason we decided to do the cross was to get practice for a spouses club social we had for the month of May.  Last night we went back to the studio for a private party and had an artist teach us how to paint a T45.  I was nervous because I wasn't sure I could actually get it to look like an air plane.  I had a bit of help from the instructor with the body of the plane and I only painted one wing wrong so I was proud of myself!